
Managing a Job's Documents and Photos
Managing Documents
Chronicle serves as your filing cabinet, keeping all documents related to a job: estimates, letters, photos, Excel spreadsheets, or whatever else you might happen to have. Managing your documents with Chronicle saves you time and makes your work easier in a number of ways.
Greater security
When you're dealing with paper documents, there's always the danger of documents or even whole folders getting lost. Once your documents are in Chronicle, however, the job file can go out the door without your ever having to worry about anything being lost, ever.
In addition, in a society where people often sue for no good reason, having your documents where they can't be lost, and where you can retrieve any document in seconds, is also an important form of protection.
Less paper
Chronicle saves you space; your whole filing cabinet fits in your computer. It also saves you paper: you don't need to print documents for others to have them, even to fax them.
Time savings
By the time you find a job's folder, go to the fax machine, add a cover sheet, send the fax, and then get the file correctly put away, the average fax takes 17 minutes. Using Chronicle, you can fax or email any document without ever leaving your desk. And when an adjustor calls and asks you to resend the report you sent him last Thursday, you can resend documents in seconds.
Chronicle also saves you time by generating forms with job information already on them.
And when a customer calls up for information about a job that was completed months or years ago, instead of taking days to find the right file, you have the information in seconds.
Easier access to job information
With paper files, you need to find the job folder every time you need job information. Many offices end up with multiple files for the same job, so you not only need to head down the hall to find the job file, you have to also hope that you find the right job folder. If the folder you need is on someone's desk, or if you're following up on something from your home office, you just may not be able to get the information at all. With Chronicle, on the other hand, you can access the information from anywhere, and multiple people can look at the job folder at once.
Better management
Chronicle improves your management in a few ways. The Chronicle journal tells you exactly when the document was sent and to whom; when an adjustor or customer says that you didn't send a document you were supposed to, you now have a record and can reply: "The document was faxed on 10:10 last Thursday, but I can send it again if you'd like." And if a customer refuses to pay and you need to take legal action, the complete record that Chronicle provides is very strong documentation of everything that you have done.
In addition, with a paper file (especially when there's more than one for the same job), it isn't always clear what's in it and what has been left out. With Chronicle, you can identify which documents are required for a particular type of job so you know if you are missing any documents for a job. Chronicle lets you easily find jobs that are missing documents. This is sometimes important in knowing whether it's time to invoice the job.
Getting to the Documents Screen
- Find the job, person, organization, or piece of equipment you want to add or view documents for.
- Once the appropriate job/person/etc. is highlighted, right-click and pick Documents from the menu.
You can also click Go and click Documents, click documents in the toolbar at the top of the screen, or double-click any document-related entry on the panel on the right of the screen.
The Documents Screen
To add a document: Click the Add button. Further detail is provided below.
To look at a document or change the document’s content: Click the document and then click the View button or double-click the document in the list.
To change information about the document: Click the Edit button, or click the corresponding information on the right side of the screen. Entries that you can change turn blue and are underlined when you point to them. (The Edit button does not let you change the content of the document; it only lets you change information about the document; to change the content of the document, click the View button or double-click the document in the list.)
To fax/email documents: Click the box to the left of each document name that you want to send, and then click the Fax/Email button. Chronicle creates a new journal with the selected documents attached. Send the email/journal just as you would elsewhere in Chronicle. Further detail is provided below.
To check required documents: Click the Required Documents tab at the top of the screen. Further detail is provided below.
Tabs on the documents screen
Detail: This shows the selected document's name, department, security level, status, classification, creator, and creation date/time.
More Detail: This shows Chronicle's internal ID number, the document type, and the document size.
Communications: If the document has been emailed or faxed, this shows who it's been sent to and when.
Prior Versions: This tab only appears if you have changed the document. It lets you see previous versions of the document.
Creating, Importing, or Scanning Documents
Chronicle stores copies of everything that you would traditionally have put into a paper file. For example, when you get the signed contract or work order from the client, you would scan those documents into Chronicle. This saves space since you no longer have to maintain bulky paper files for every job. It makes sure documents never get misplaced. And it makes all material related to a job available to anyone who needs it without having to find whoever has the file.
- On the Documents screen, click the Add button.
Getting to the Docs screen is explained above. - Indicate what department the document is for, what document you are attaching, and where Chronicle should get the document from.

Department: Pick the department the document is associated with. Every document must be associated with a department.
Meets Requirements For: This lists each document that’s defined for the department you just picked. (See Defining Standard Documents) If you’re adding a defined document, click the name in this list: Chronicle automatically fill in the Name and Source for the document you picked.
Name: Enter a name that describes the document you are adding. Chronicle automatically fills this in if you picked a defined document above, but you can change this if needed.
Source: Indicate where Chronicle should get the document:
Import Photos or Images: This lets you import graphics (.jpg, .bmp., .gif, .tiff, etc.). Use this for photos from a digital camera or for forms that you’ve already scanned in and saved on your computer.
If you pick this, you’ll be able to select files to import after you click Next. When selecting files, Ctrl-A selects all of the files in the folder you’re looking at. You can also hold the ctrl or shift keys down to multi-select files.
Once you import images, you’ll see them in Chronicle’s image viewer; see Viewing Images and Scanned Documents.
Scan a Document: If you have a scanner hooked up to your computer, this lets you scan documents directly into Chronicle.
Create New Document: This creates a new blank document of the type you pick.
Attach Existing Doc...: This lets you attach any existing file. This would include Xactimate estimates that have been exported to Acrobat (.pdf) files, Word or Excel files, and so on.
Security Level: For job documents that should be accessible to all employees, leave this set to 2. If the document contains confidential information, set the security level as appropriate.
Status: Leave this set to Active. - Click Next.
Depending on what you’ve picked, Chronicle will then bring up a dialog for picking a file, scanning options, etc. - When done adding or adjusting the document you are adding, just close the document viewer and Chronicle will save the document.
Scanning Documents into Chronicle
You must have a scanner connected to your computer to scan documents. To scan documents or photos into Chronicle:
- Follow the instructions for Creating, Importing, or Scanning Documents above, making sure that you pick Scan for the Source.
The scan settings will come up after you click Next on the New Document screen. - Change the Scan Settings if needed, and then click Scan.

For documents with signatures, Gray Scale at a resolution of 100 dpi is normally adequate.
Before you scan for the first time, you must click Select Scanner and pick your scanner. - Once the document is scanned, you’ll see it in the image viewer discussed below.
To scan additional pages, click the Add button in the image viewer, and then pick Scan Image. - When you close the image viewer, Chronicle saves the scanned document.
Viewing Images and Scanned Documents
After you scan documents or import photos, you see a screen that lets you view the images. You see this same screen when you go back to review these types of documents later.

Moving Among Multiple Images
If a document has multiple pages or multiple photos, the left side of the screen tells you how many images there are. The top arrow button on the left takes you to the first image, the next arrow moves up one image, the next moves down one image, and the final arrow moves you to the last image.
You can also use the PgUp and PgDn keys to move up and down.
Adding Additional Images
To add additional images to the document, click Add. Then choose whether you want to scan, import from a file, or past an image that is on the clipboard..
To control which drive/folder Chronicle looking for images in, click Settings and the click Default Directory to Look for Images In.

Adjusting Image Brightness and Contrast
In an image is too light or too dark, or if it has too much or too little contrast, click Brightness/Contrast. Moving the Brightness slider to the left makes the image darker; moving it to the right makes it lighter. Moving the Contrast slider to the left reduces the contrast; moving it to the right makes it lighter. If an image needs adjusting, usually you’ll have to move both of these sliders. You can see your changes immediately as you make adjustments, but the changes are only saved if you click Save; if you Cancel, the image is restored to its previous appearance.

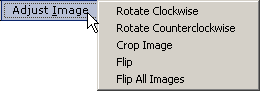
Rotating or Cropping Imported Images
To rotate or crop images, click Adjust and then pick the appropriate action from the menu.
Printing Images
To print images, click Print. You can print the current image, all images, or all selected images. (All selected includes images where the Include this image... checkbox is checked.) You have these options:

Actual size: This does NOT necessarily print the image the same size as the original document; it sizes based on the number of pixels in the image; this is determined by the resolution chosen when the image was created or scanned.
Maximum Proportional Size: This prints the image as large as possible without distorting the image. This generally enlarges a wide image to the width of the page; it enlarges a tall image to the height of the page. This is the best option if you want to enlarge a photo; it is also a good option for printing scanned documents.
Fit to Page: This makes the image fill the page. For photos, this usually distorts the image. It can be useful for full page scanned documents, but Maximum Proportional Size above is good for that as well.
4 per Page: If you are printing multiple images, this prints 4 images on each page. This is disabled if you are only printing the current image. If you choose this, you can choose whether or not you want the images numbered.
Changing the View Percentage
To change how much an image is enlarged or reduced when viewing it in Chronicle, click the View menu, and choose a percentage. This doesn’t change the resolution of the saved image; it only affects the display on the screen in Chronicle.
You can also press the + or - keys to enlarge or reduce the view. And you can use any of the following shortcut keys to jump to a particular resolution:
Ctrl-1: View at 100%.
Ctrl-2: View at 200%.
Ctrl-3: View at 300%.
Ctrl-4: View at 400%.
Ctrl-5: View at 50%.
Ctrl-8: View at 80%.
Ctrl-1: View at 100%.
Entering Descriptions for Images
You don’t have to enter descriptions for individual images, but if you want to, click the Description entry at the top of the window. This description applies specifically to the current image.
Controlling Which Images Get Emailed/Faxed
At the top left of the screen, the checkbox Include this image if this set of images is emailed/faxed controls whether the image is included if you email or fax the images to someone outside of the office. (This checkbox has no effect if you send the images to someone in the office; the user would just get a link to the whole set of images.)
The Edit menu has options for selecting or unselecting all images at once.
If you uncheck this box for any image, a message appears that tells you how many of the images in the set are selected.
In addition to being used for emailing/faxed, this checkbox is also used if you click Print and choose to print Selected Images.
Saving Your Changes
Some changes are saved immediately. Any changes that aren’t saved when you make them are automatically saved when you close the image viewing window.
Faxing or Emailing Documents
- On the Documents screen, check the box to the left of each document that you want to fax or email.
Getting to the Docs screen is explained above.
If you want to send only some of the pages or images in a set of images, open the document and check the box by Include this image if this set of images is emailed/faxed for any image you want to send; uncheck this box for any image you don’t want to send. The Edit menu has options for selecting or unselecting all images at once. If you uncheck this box for any image, a message appears telling you how many of the images in the set are selected.
- Once all the documents you need to send are checked, click the Fax/Email button.
Chronicle will add a new journal and attach all selected documents to it. - Create the rest of the journal and send it just as you would any other journal.
Checking Required Documents
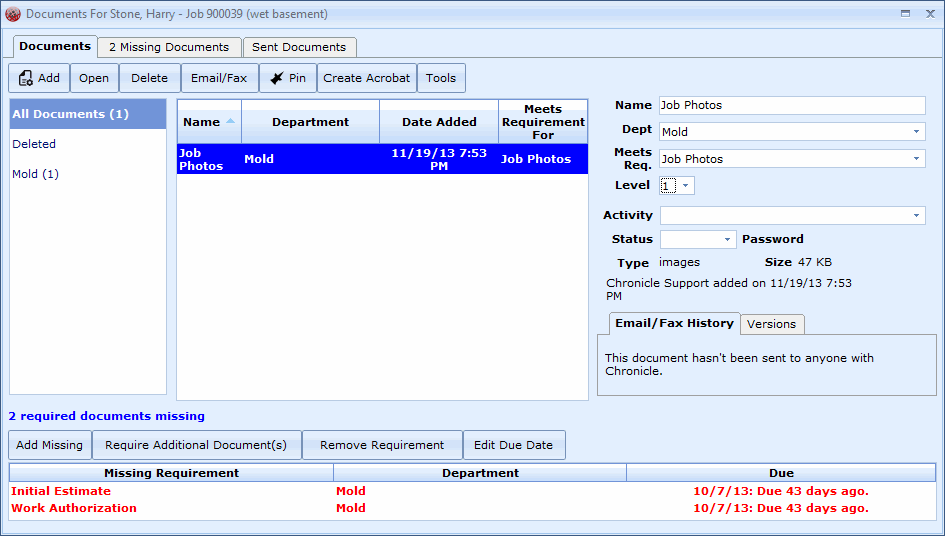
To make sure that all required documents are present, click the Required Docs tab at the top of the Documents screen. (Required documents only apply to jobs; you don't see this tab if you are looking at documents for a person, organization, or piece of equipment.) You'll see a screen that looks like this:

Documents that have been added are shown in black, missing documents that aren't overdue are shown in blue, and missing documents that are overdue are shown in red.
You can add required documents with the Add Document button on this tab or with the Add button on the main Document List tab; Chronicle will identify a document of the appropriate type as a required document regardless of where it is added.
If you didn't choose a required document set when you added the job, you can choose one here by clicking Add Required Doc. Set.
To indicate that a document on the Required Documents list is not required, click the document and then click Remove Required Doc.
Deleting Documents

- On the Documents screen, click the document that you want to delete.
You can't check the boxes next to several documents and delete a group of documents; you can only delete one document at a time. - Click the Edit button, and then click Delete Document.
Getting a Deleted Document Back
- At the top right of the Documents screen where the entry says Active, click the dropdown and choose Deleted.

This takes you to a list of any documents that have been deleted. - Click document to undelete.
- Click the Edit button, and then click Undelete Document.

- Once you are done, choose Active again to return to the list of current documents.
Comments
0 comments
Please sign in to leave a comment.